
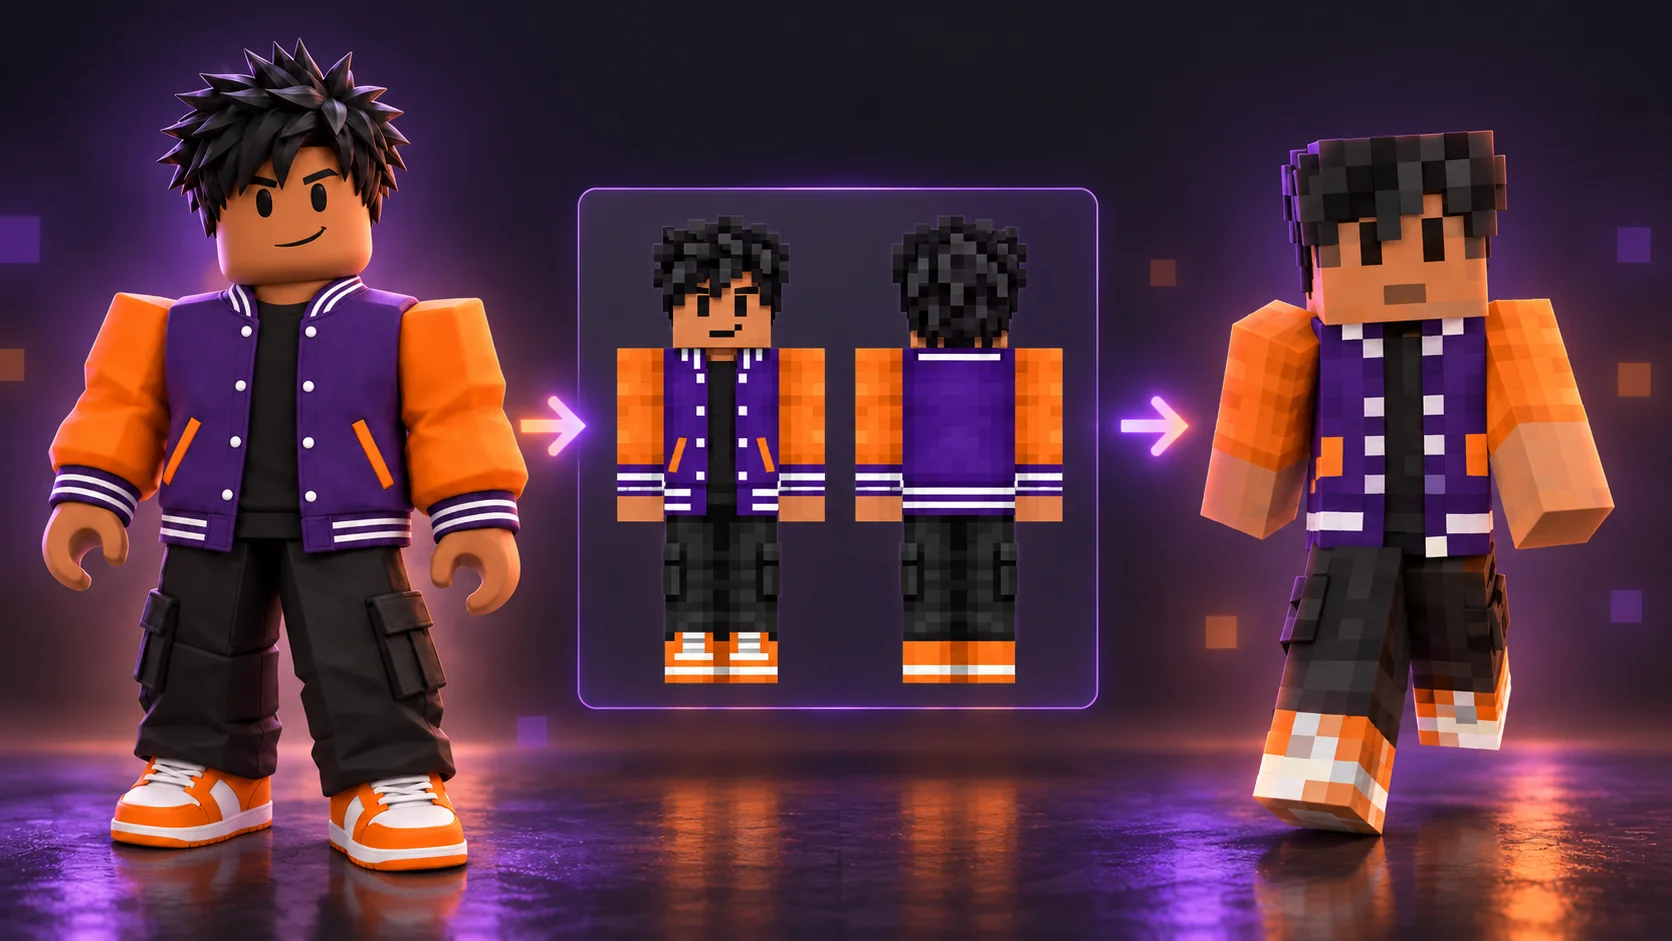
To turn a Roblox avatar into a Minecraft skin, upload a clear avatar image to ImagineGo’s AI Minecraft Skin Generator, choose Photo To Skin, and download the completed 64×64 PNG. You can inspect the skin in 3D and edit it before importing it into Minecraft. The original download uses Classic/Steve arms.
Your Roblox character already has a look: the hair, jacket, shoes and colors you chose. An AI conversion uses that appearance as a reference and rebuilds it for Minecraft’s pixel texture. Here is how to prepare the image, keep the details that matter, and get a skin file you can use in the game.
Bring your Roblox look into Minecraft
Upload your avatar image, preview the skin, and make it your own.
What does a Roblox skin to Minecraft skin converter actually convert?
For this workflow, the input is a picture of your Roblox avatar. The output is a Minecraft skin texture PNG, with separate mapped regions for the head, torso, arms and legs.
Roblox clothing files and Minecraft skins use different layouts. Roblox’s classic clothing documentation describes separate shirt and pants templates that wrap around an avatar. Those templates cannot simply be renamed or resized into a Minecraft skin. Minecraft’s official skin guide describes its required input as a flat, unwrapped PNG.
An avatar screenshot gives the AI a view of the assembled outfit, including the face, hairstyle and shoes. ImagineGo creates front and back Minecraft character views, then builds the downloadable skin texture from that design. It does not import your Roblox account, inventory or character mesh.
That distinction matters for accessories. A varsity jacket’s orange sleeves can become orange arm pixels. A tall hairstyle becomes a smaller blocky hair pattern. Wings, floating pets and oversized shoulder accessories need a simplified visual interpretation; a standard skin PNG cannot transfer their separate Roblox geometry into Minecraft.
A real example: purple varsity avatar to Minecraft skin
This published ImagineGo example starts with a Roblox-style avatar wearing a purple varsity jacket, orange sleeves, black cargo trousers and orange-and-white shoes.
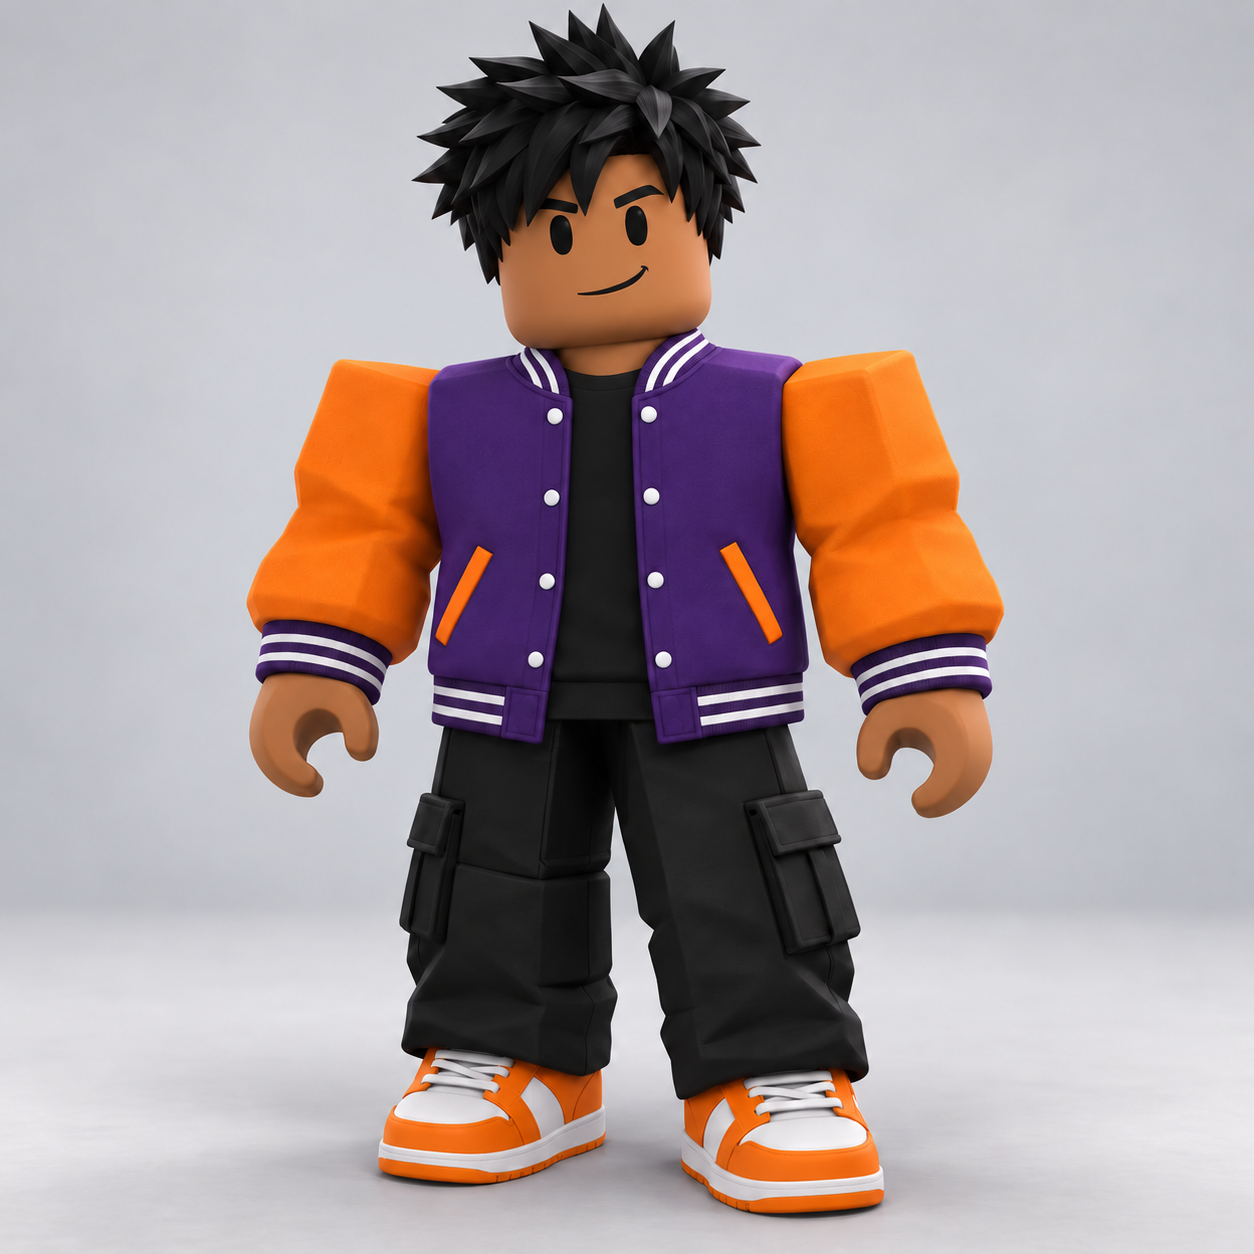
The strongest identifying details are the purple torso, orange sleeves, white jacket trim and contrasting shoes. These large color blocks remain recognizable when the character becomes a smaller pixel design.
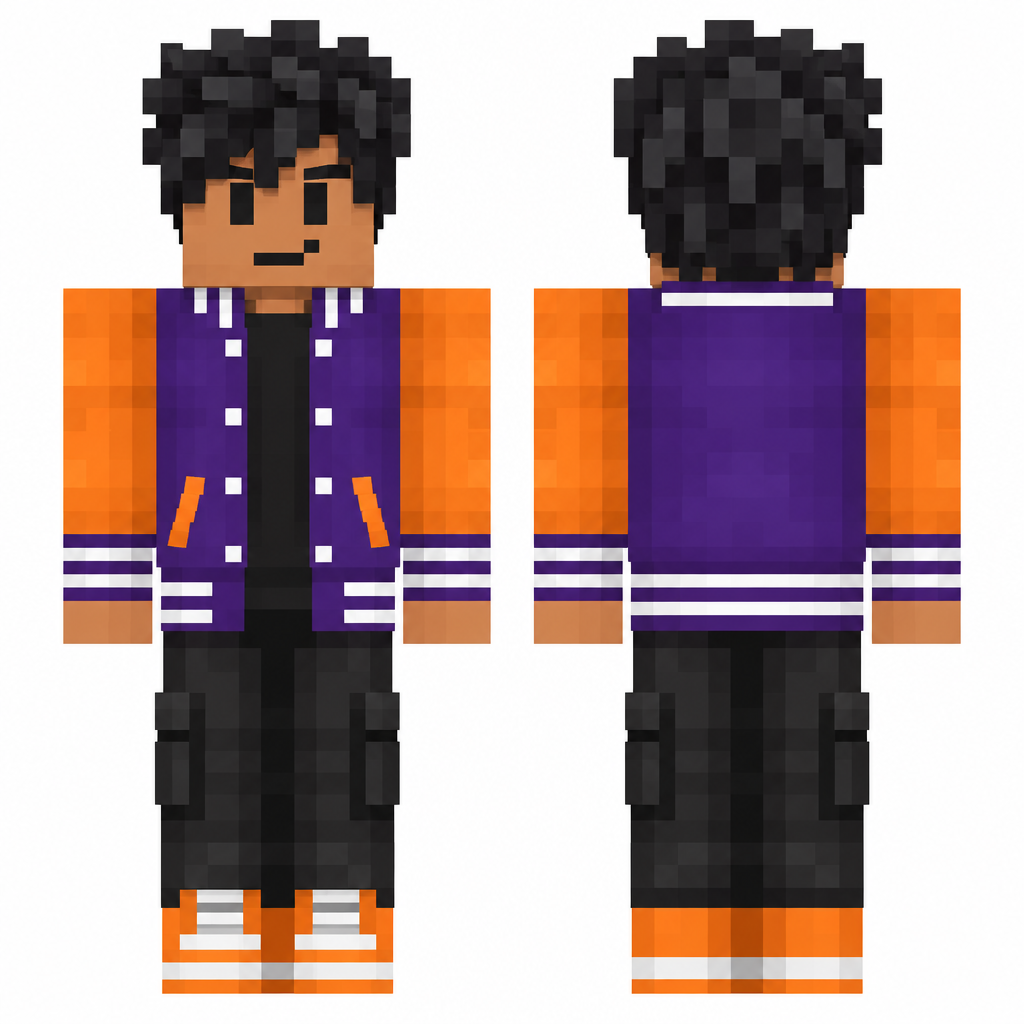
The front and back design preserves the outfit’s color pattern while simplifying the hair, pockets and clothing folds. The white trim connects the two views, and the back of the jacket follows the same purple-and-orange palette. This is a useful way to judge your own result: compare the features that define the character, rather than expecting every fold or strand to survive.
The image above shows the character design. The file to import into Minecraft is the unfolded texture below.

Download the sample Minecraft skin PNG. Keep the downloaded file at its original 64×64 size.
View the sample skin in 3D
Use Front and Back, adjust the rotation slider, or enable Walk to inspect the actual skin texture on a moving character. Pay attention to how the sleeves meet the torso and how the shoes wrap around the feet.

Loading the 3D skin preview…
How to convert your own Roblox avatar into a Minecraft skin
1. Capture a clear, full-body avatar image
Use an image of the avatar you want to recreate. A front-facing, neutral pose is a practical starting point because it makes the face, torso, sleeves and legs easier to distinguish.
Before uploading:
- Include the whole character, from the top of the hair to the shoes.
- Crop out menus, chat boxes and other characters.
- Keep the arms visible instead of covering the jacket with an item or pose.
- Choose lighting that makes the outfit colors easy to see.
- Use an avatar image you own or are authorized to edit.
A plain background helps isolate the design. Keep enough image detail to show the outfit; you do not need to shrink your reference to 64×64. That size belongs to the final skin.
2. Open Photo To Skin and upload the reference
Open ImagineGo’s Roblox avatar conversion workflow, select Photo To Skin, and upload your character image. The upload accepts PNG, JPG and WebP files up to 10 MB.
Choose Photo To Skin when you want an image-based skin download. Concept image creates character artwork, which serves a different purpose from the mapped PNG you import into Minecraft.
3. Describe the details you want to keep
Use the optional instruction field to name the most recognizable features. For an outfit like the published varsity example, you could write:
Keep the black spiky hair, purple varsity jacket, orange sleeves,
white jacket trim, black cargo trousers and orange-and-white shoes.
Keep the back of the jacket purple. Simplify the hairstyle and pocket
details into clear Minecraft pixels. Keep the face visible.
This is a suggested prompt you can adapt. Change the colors and clothing to match your own character. If the reference hides the back of the outfit, describe the back you want: “plain blue hoodie,” for example, or “continue the red jacket without a logo.”
For an accessory-heavy avatar, decide which features to prioritize. A clear face and signature outfit often make a more readable skin than trying to fit every small accessory onto the same character.
4. Review the skin from all sides
Once generation completes, inspect the skin in the 3D preview. Look for the right hairstyle, outfit colors, face and shoes, then rotate the character to check the sides and back.
Use these questions to guide a quick review:
- Do both sleeves follow the same jacket design?
- Does the torso color continue sensibly around the sides?
- Are the hairline and face easy to read?
- Do the trousers and shoes remain distinct?
Small fixes are often easier in the editor than in another generation. You can repaint a sleeve edge, change the shoe color or remove a stray pixel without rebuilding the entire design.
5. Download the completed skin PNG
Download the 64×64 skin PNG, rather than saving the character illustration or taking a screenshot of the preview. The texture may look like disconnected pieces on a flat sheet; those pieces wrap around the player model.
For the original ImagineGo download, use Classic/Wide when choosing the Minecraft arm model.
Edit the outfit and change wide or slim arms
The Minecraft Skin Editor lets you import the generated PNG, paint pixels, adjust the outfit and preview your changes in 3D. Manual editing and PNG export are free.
You can also use Toggle skin model to switch between Classic/Steve, with four-pixel-wide arms, and Slim/Alex, with three-pixel-wide arms.
To adapt your avatar skin for a different arm model:
- Import your downloaded PNG into the editor.
- Switch to the arm model you want.
- Inspect the shoulders, sleeve fronts and arm sides in 3D.
- Touch up the arm pixels if the new mapping exposes gaps or shifts the trim.
- Download the edited PNG and choose the matching arm model in Minecraft.
Switching models changes how the arm texture wraps. Review it before exporting, especially when your Roblox outfit has contrasting cuffs or detailed sleeves.
Use the converted skin in Minecraft
For Java Edition, open Minecraft Launcher → Minecraft: Java Edition → Skins → New Skin. Select the downloaded PNG, choose Classic/Wide for the original output, and save and use the skin. Choose Slim if you adapted the file for Slim arms in the editor. Minecraft documents this workflow in its official skin guide.
For Bedrock on Windows or mobile, use the Dressing Room’s Classic Skin import options to select the PNG. Custom PNG importing is not officially supported on Xbox, PlayStation or Nintendo Switch. Minecraft’s Character Creator FAQ explains the Windows/mobile support and console restriction.
For more detail on the file layout and installation workflow, see how to turn a photo into a Minecraft skin and use it in the game.
Frequently asked questions
Can I convert a Roblox username directly into a Minecraft skin?
ImagineGo’s workflow uses an uploaded character image. Capture your avatar’s appearance and upload that image in Photo To Skin. A Roblox username alone is not an image input.
Can I upload a Roblox shirt template instead of an avatar screenshot?
Use an image of the dressed avatar for this guide. A shirt template only contains clothing regions; it does not show the complete character’s face, hair, trousers and assembled outfit. It also uses a different texture layout from a Minecraft skin.
Will the Minecraft skin look exactly like my Roblox avatar?
The goal is a recognizable Minecraft interpretation. Hair, clothing colors and simple patterns can carry across, while tiny lettering, complex faces and separate 3D accessories need simplification. Review the result and edit the details you care about most.
Does the converter work for R6 and R15 avatar images?
The input is a rendered picture, so the workflow does not import an R6 or R15 rig. Use a clear image showing the avatar’s outfit. The Minecraft result follows its own player model rather than preserving Roblox’s joints or body proportions.
Do I need to transfer my Roblox account or buy the outfit again?
This workflow creates a new Minecraft skin from an appearance reference. It does not transfer accounts, inventory, purchases or ownership of Roblox items between games.
Bring your Roblox character into your next Minecraft world
Start with a clear avatar image and the outfit details that make it yours. Use Photo To Skin to create the texture, inspect it in 3D, then download the PNG or refine it in the editor. A purple jacket, an orange sleeve or your favorite hairstyle can become the detail that makes your Minecraft character instantly recognizable.
Ready to convert your avatar?
Create a Minecraft skin from your Roblox character image, then fine-tune the pixels and arm model.