Turn a hand drawing or digital sketch into a realistic concept render. Upload your sketch and describe materials, light and mood.
Sketch to Render workspace
GPT Image 2.5 · 1K6 points / render
Sign in to upload. Each generation uses points; the cost is shown before you generate.
Sketch to Render preview
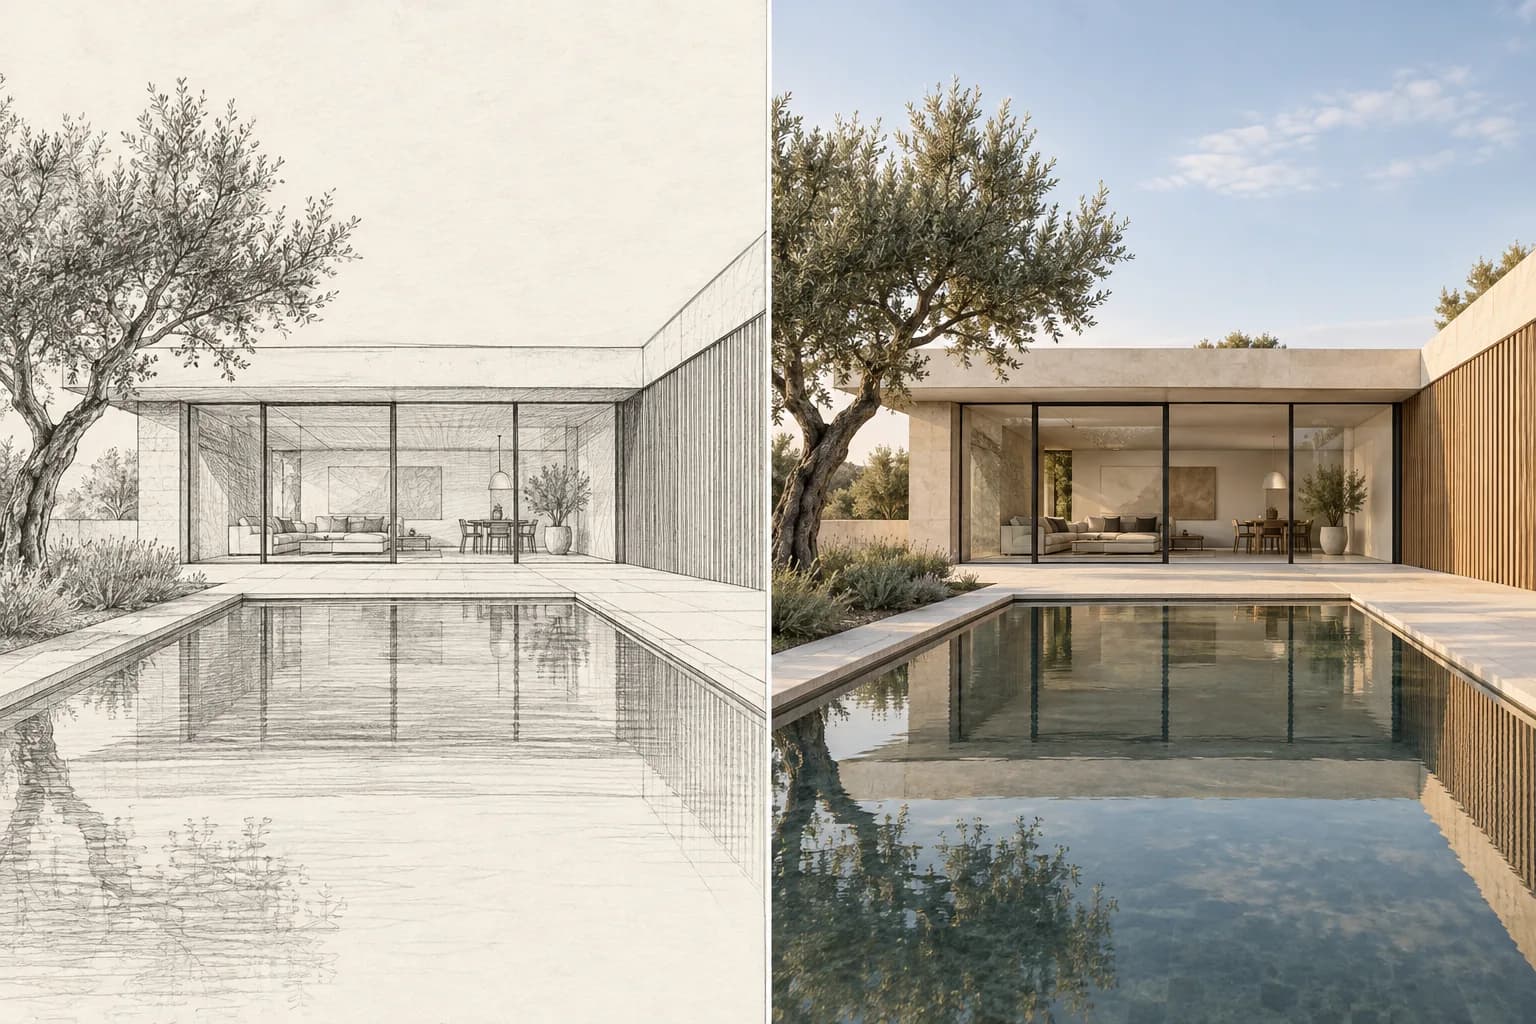
AI-created concept illustration: sketch on the left, render on the right. This comparison is illustrative, not a verified GPT Image 2.5 output. Your result will vary.
Sketch to Render: from lines to material and light
A clear outline can communicate a building, but materials and light help people understand how it might feel. This pavilion comparison illustrates the goal of sketch to render: develop a line drawing into a visual concept while using its viewpoint and main forms as reference. Compare the roof edge, glazing, pool and timber wall rather than judging realism alone. The tool asks GPT Image 2.5 to follow these structural cues, although exact geometry is not guaranteed.
AI-created concept illustration: sketch on the left, render on the right. This comparison is illustrative, not a verified GPT Image 2.5 output. Your result will vary.
How to use Sketch to Render
01
1. Upload a readable sketch
Choose one perspective drawing, elevation or digital line sketch in PNG, JPG or WebP, up to 10 MB. Photograph paper straight on, crop away your desk and make important edges easy to distinguish. Use a drawing you own or have permission to process. Sign in before uploading so the image can be attached to your generation task.
02
2. Describe the intended finish
Specify the subject, main materials, lighting and details that must stay in place. A short direction such as pale limestone facade, oak screens and soft afternoon daylight is enough to begin. Leave the field empty for a realistic daylight interpretation. The original sketch supplies visual structure; your words guide its surfaces and atmosphere.
03
3. Generate, review and download
Check the points shown beside the button, then generate a render with GPT Image 2.5. Wait for the task to finish before downloading the image. Review openings, silhouettes and scale against the source. If a material or detail feels wrong, adjust that part of the direction and generate another version. Each new generation uses points.
Why use Sketch to Render for early design?
Make an early idea easier to discuss
Sketch to Render helps translate linework into a visual that clients and teammates can interpret without reading every pencil mark. Texture, depth and shadows bring a concept into focus. Use the result to discuss atmosphere and material direction before spending time on detailed modeling. Keep the sketch alongside the render so the design intent remains clear.
Explore materials with a consistent reference
Use the same drawing to compare brick with stone, oak with walnut, or a matte product finish with polished metal. Change one choice at a time and retain the same viewpoint in your instructions. Because generative results can drift, compare important edges after each attempt instead of assuming every version has identical proportions.
Work directly from an image in your browser
The workflow starts from an uploaded image and does not require you to construct a 3D scene first. It suits quick concept studies, presentation preparation and personal design exploration. GPT Image 2.5 supplies a rendered image guided by your reference. For controlled measurements, engineering data or a reusable scene, continue in a dedicated CAD or 3D workflow.
Sketch to Render use cases
Architectural exteriors and facade studies
Turn a hand-drawn house, pavilion or building elevation into an architectural concept rendering. Describe cladding, glazing, landscaping and time of day, while identifying rooflines and window positions to preserve. This is useful for discussing exterior character and the relationship between built forms and their surroundings. Check invented details before sharing the image as a proposal.
Interior design and room concepts
Upload a perspective sketch of a living room, kitchen or hospitality space to explore finishes and lighting. Name the flooring, joinery, upholstery and daylight direction. Ask the model to retain furniture placement and window positions. A concept render can support a mood-board discussion, but it does not verify room dimensions, accessibility clearances or the availability of depicted furnishings.
Product and furniture design
Use a clean sketch of a chair, lamp, speaker or other object as a starting point for material studies. Describe surface finish, color, background and studio lighting. Ask for the original silhouette and camera angle to remain. Inspect handles, seams and joints carefully: a plausible-looking image does not establish that a product can be manufactured.
Student portfolios and concept presentations
Develop a visual sequence that shows the original drawing, the rendering direction and a reviewed concept image. This makes the evolution of an idea easier to explain. Label AI-assisted visuals clearly and follow the requirements of your course, client or publication. Add your own design rationale instead of presenting an automatically generated image as evidence of technical resolution.
Sketch to Render quality and prompt tips
Give the model clean visual signals
Increase contrast on the edges that define your design and remove notes that are not meant to appear in the result. Keep perspective lines coherent and avoid uploading several unrelated sketches as one image. Ambiguous strokes invite interpretation. An elevation can guide a facade, while a perspective drawing provides more clues about depth and camera position.
Separate fixed structure from visual choices
State what must remain: the same viewpoint, roof profile, number of openings or product silhouette. Then describe what may change: materials, color, light and environment. Avoid contradictory instructions or a long list of styles. If the geometry changes, simplify the direction and return to the original drawing for the next attempt.
Review the image as a concept, not measured data
Sketch to Render produces a two-dimensional visual image rather than an editable 3D model, CAD drawing or construction document. Fine details, dimensions, text and hidden surfaces may be interpreted incorrectly. Review these with an appropriate designer before making design decisions. Keep your source files and use specialist software where precise geometry matters.
Prepare files responsibly
Upload only drawings you are authorized to use. Remove client names, addresses, signatures and confidential annotations before processing sensitive work. Images are uploaded for remote generation; this is not an offline renderer. Consult the site privacy policy and applicable project requirements before submitting private designs. Do not infer a confidentiality guarantee from the appearance of this page.
A Sketch to Render prompt you can adapt
Render this courtyard pavilion as a realistic architectural concept. Keep the original camera angle, flat roof profile, glazing layout and pool position. Use pale limestone walls, warm oak slats and subtle glass reflections. Add soft afternoon sunlight and restrained planting. Do not add floors, windows or text. Treat the source sketch as the design reference.
It is an image-to-image workflow that uses a drawing as a reference for a more realistic visual. ImagineGo sends your sketch and rendering direction to GPT Image 2.5. The result adds an interpretation of materials, lighting and depth, suitable for concept exploration rather than measured design documentation.
Which sketches and file formats can I upload?
Upload one PNG, JPG or WebP image up to 10 MB. Hand drawings, tablet sketches, perspective studies and image exports of CAD linework can work when the important forms are readable. Export native CAD or vector documents to a supported image format first; this tool does not parse their geometry.
Will it preserve every line and dimension?
No. The generation instructions prioritize composition, viewpoint, proportions and major openings, but GPT Image 2.5 may reinterpret details. Compare the render with your original sketch and verify important features. There is no geometry-lock or dimension-accuracy guarantee.
Can I use it for interiors and product sketches?
Yes. Describe the room or object, intended materials and lighting. Interior drawings benefit from clear furniture and window placement; product sketches benefit from a distinct silhouette. The same upload-and-render workflow applies, with results depending on drawing clarity and the direction you provide.
Does Sketch to Render create a 3D model?
No. This page generates a rendered image, not an OBJ, GLB, editable mesh or CAD file. If you need a downloadable model, use the related Image to 3D tool and review its own capabilities. A realistic image alone does not contain verified three-dimensional geometry.
Is Sketch to Render free, and how many points does it use?
Rendering uses points. The current cost is calculated from the GPT Image 2.5 model registry and displayed before generation. This page uses the 1K setting. Sign-in is required to upload and generate; availability of any promotional points depends on your account. There is no unlimited-free claim.
How can I improve a result that changes my design?
Start with a clearer drawing and explicitly identify the fixed roofline, openings or silhouette. Limit your direction to a few material and lighting choices. Generate again from the original sketch instead of repeatedly rendering an altered result. Review each attempt; perfect preservation is not promised.
Can I use a render in a client presentation?
A reviewed concept image can help communicate an idea, subject to your rights in the source drawing and the applicable service terms. Label AI-assisted imagery and explain its conceptual status. Verify design details and any commercial-use requirements before publication; a render does not replace professional documentation.
Start your next Sketch to Render concept
Upload one drawing, describe the finish you want and explore a visual direction for your next design.